Stewart
Fig. 3. Top cover and lever assembly and float and stem assembly.
Filling the Tank on First Starting
Close the throttle to establish the greatest vacuum in the manifold,
and turn over the engine with the starting motor for about ten
seconds, or while counting ten slowly. Wait a few seconds to allow
the fuel to flow to the carburetor, then start the engine as usual.
Some tanks have a hole in the top with a pipe plug in it to provide
a more direct means of priming the carburetor. A pint will be ample.
Care of the Stewart Vacuum Tank
No care whatever is required of the tank and it is quite unlikely
that you will ever have to touch it because of any imperfect functioning
of the tank.
Instructions for Disassembling
It is not necessary to remove the tank from the car to repair it.
W hen the cover is removed the float and operating mechanism is
found attached. The inner shell (M) may be lifted out, exposing
the flapper valve.
1. Disconnect the fuel line (U) and vacuum line (J) connections.
2. Remove the eight screws from the top.
3. Loosen the cork gasket by running a knife under it. In the new
tanks only one gasket is used. The inner shell has a narrow flange
so that the gasket covers both the flange and the screw holes in
the outer shell. This gasket is wider than the old one formerly
used.
4. Lift the cover with the mechanism and float attached.
5. Lift out the inner shell, if required. To Reassemble
1. Replace the inner shell.
2. Replace gasket in position, with the large hole in edge over
the vent tube (H) in the outer shell.
Before replacing the gasket be sure there are no broken or damaged
places. Be sure there are no pieces of gasket or other foreign
matter on the cover or shell. The gasket is soft enough to take
up small irregularities in the surface if they are clean.
3. Replace the cover with the mechanism attached. In doing this,
be sure that it is placed so that the short vent tube in the outer
shell is directly under the corresponding vent opening in the cover.
Also be sure, as the cover is lowered, that the
float stein enters the guide, as shown in Fig. 1. If it enters
as it should the mechanism will not trip unless the tank is half
full of fuel. The tank cannot operate unless the stem is properly
entered.
4. insert the eight cover screws and tighten them.
5. Connect the fuel and vacuum lines. Possible Troubles; Their
Causes and Remedies
General: It is very seldom that there is any trouble with the mechanism
of the tank. Practically all reported failures of the fuel supply
are found, on careful investigation, to he really failures of some
part foreign to the tank itself, such as the carburetor, clogging
or leaking of connecting lines, etc., as described below.
Failure to Draw Fuel
1. Air leak in vacuum line or fittings. Air leak in supply line
or fittings from supply tank to vacuum tank.
This may be caused by loose or broken fittings at the vacuum tank,
supply tank or manifold or by split, broken or worn tube. It will
be most likely to prevent operation on open throttle, but will
not cause total failure unless the leak is very bad.
To repair, replace broken tube or fittings or tighten loose fittings.
2. Plugging of supply tank vent (usually in the filler cap). This
may also cause some gasoline to be forced out of the vacuum tank
vent, due to expansion of the gas in the supply tank creating a
pressure.
3. Restriction in supply tube (U) (Fig. 2). Any restriction will
limit the flow of fuel. Restriction may be caused by dirt clogging
the screen (S) (Fig. 1) at the vacuum tank or the entrance to the
tube at the supply tank, especially when a valve or screen of arty
kind is used.
It may also be caused by a sharp bend in the tube or dirt clogged
in the tube at bends, etc.
user-Rich Mixture or Flooding Engine
Float leak: A leak in the float will cause it to fill partly, fail
to open promptly, or at all, the atmospheric valve and close
the vacuum valve. This will cause gasoline to fill the inner
chamber and be drawn through the vacuum valve into the manifold,
resulting iu an over-rich mixture or flooding the engine, especially
on idling.
To repair, see "Instructions for Disassembling."
Punch a very small pin hole in the float and empty it of fuel.
Solder the leak and the pin hole, then test by immersing it in
a pan of hot water. If no bubbles are seen, the float is air tight.
2. The vent tube (K) or passage (H) may become clogged with dirt,
which will cause a failure of fuel to flow from the outer chamber
to the carburetor. Clean out the affected part.
3. The atmospheric valve (C) may not seat properly, due to dirt,
corrosion, etc. This will prevent building up of vacuum in inner
chamber, and if it will not scat tight by cleaning, a new valve
or seat may be necessary. (Examine this valve from above by removing
sleeve SA.)
If the vacuum valve (B) does not seat properly, there will be a
continuous flow of air coming in through the atmospheric valve
and out the vacuum valve while the tank is dumping. This will not
interfere with the operation of the tank or engine.
<
Previous page 1927
Supplement Home Next page 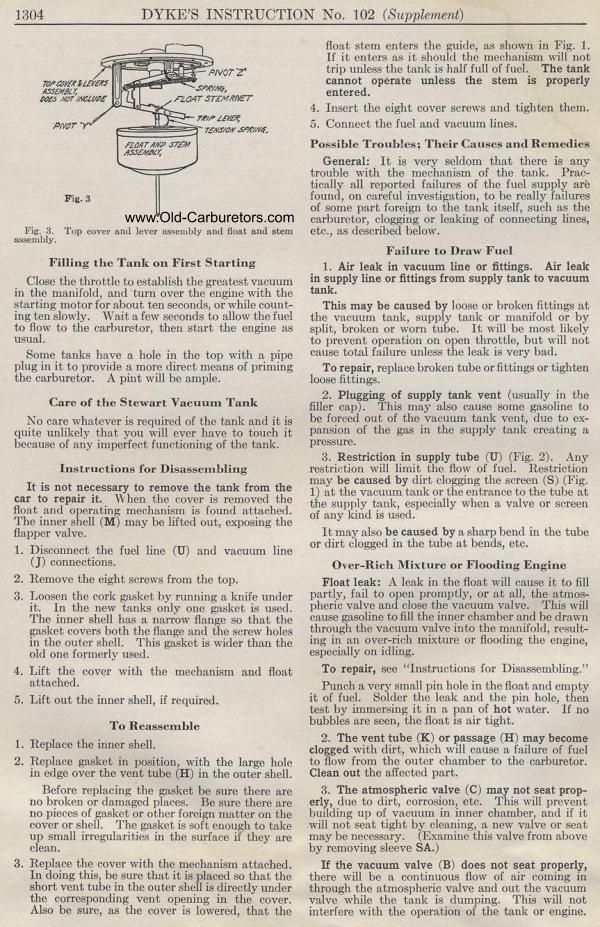
|