Stewart
4. The atmospheric valve (C) may fail to open under extreme conditions
of high vacuum in inner chamber and weak springs.
As the vacuum valve does not close till after the atmospheric valve
opens, fuel will be drawn through the vacuum valve into the manifold
and cause a too rich mixture. This condition is prevented on all
tanks of 1924 and later make, by the float lever striking the valve
lever and opening valve (C).
A sufficiently high vacuum in the inner chamber to cause failure
of some earlier model tanks may be caused by plugging the supply
tank vent, too small a delivery pipe from the supply tank, kinks
in it or clogging of screen (S).
5. On a car that has been idle for some time with gas left in vacuum
tank, the flapper valve may leak, permitting air to flow in sufficient
quantities to prevent the vacuum building up in the inner chamber.
This is usually due to dirt under the valve or corrosion. Dirt
can generally be washed out by pouring a small amount of fuel in
the plug opening at the top. In rare cases the bakelite valves
that were first used failed to seat because of capillarity between
the upper end of the flapper and the valve body. This is cured
by installing a new valve which has a small boss on the upper end.
Test the valve by holding up to the light. If it appears very slightly
bent, press the valve down moderately with the finger, if this
closes the valve it is O. K. If not, a new valve must be installed.
6. Corrosion of the flapper valve seat may cause the flapper to
stick and prevent the fuel from flowing to the outer chamber.
7. Noise, in some of the older tanks which used brass flappers,
a rattle was produced at certain speeds. This has been eliminated
by the use of bakelite flappers and by a bakelite washer in the
float stem guide. Replace the inner shell and valve assembly with
a new one.
Vent Tube Overflow
The air vent allows an atmospheric pressure to be maintained in
the lower chamber, and also serves to prevent an overflow of gasoline
in descending steep grades. If once in a long while a small amount
of gasoline escapes, no harm will be done and no adjustment is
needed.
However, if the vent tube regularly overflows, one of the following
conditions may be responsible:
a) Air hole in main gasoline tank filler cap may be too small or
may be stopped up. The expansion of the gasoline vapor causes a
pressure which forces the fuel into the vacuum tank and out the
vent. If the hole is too small, or if there is no hole at all,
the system will not work. Enlarge hole to one eighth inch diameter,
or clean it out.
b) If pressure system was displaced by vacuum feed, the pressure
system may not have been disconnected: if so, disconnect same.
There must be no pressure in the main gasoline tank.
c) The vacuum tank may be too close to the hot engine, in which
case place it farther from this source of heat.
You can also remedy the overflow by attaching a length of tubing
to the vent connection and carrying it to the highest point under
the hood.
d) The vacuum tank may not be installed quite high enough above
the carburetor. If the bottom of the tank is not three inches above
the carburetor, raise the tank.
Replacing Pressure Fuel System with the
Stewart Vacuum Fuel Feed
System
When the Stewart vacuum fuel system is sold direct to a car owner,
the following parts and fittings are supplied:
One Stewart vacuum tank, with bracket. One solderless coupling.
Three solderless elbows.
The Stewart vacuum tank is installed on the engine side of the
dash. If the tank cannot be installed under the hood it may be
placed on the driver's side of the dash.
Fig. 4. Outside shell assembly, showing brackets. Bolts or screws
to fit the holes in brackets can be 1" or r',,"; 1" preferable.
Bear in mind these four points in placing and attaching the vacuum
tank:
1. The top of the Stewart vacuum tank must be above the level of
gasoline in the main supply reservoir when full, even when the
car is going down steep grades.
2. The bottom of vacuum tank must be not less than three inches
above carburetor.
3. Do not install Stewart vacuum tank directly over generator,
nor over any terminals on which gasoline could possibly leak.
4. It is usually necessary to ream the carburetor float valve hole
to about double its present area to permit a sufficient flow of
fuel by gravity front the vacuum tank for open throttle operation.
Where necessary to bend tubing, do so with a round bend, so that
the diameter of the tubing is not made smaller at the bend and
so that there are no sharp curves. Never cut the tube with shears,
use a hacksaw or file, and square the end.
Attach the vent tube as shown in Fig. 1. See that the compress.on
collar 17741 is in place, with flat side down, and that the tube
goes in as far as possible before the sleeve is screwed down.
Screw into the bottom of the vacuum tank the coupling elbow like
the one marked (E), Fig. 1, and two of these into the top at (U)
and (J).
Drill and tap the intake manifold for connecting the vacuum line,
as shown in Fig. 2. Be very careful to avoid tapping at a point
in the manifold which is protected by a water jacket.
Into the hole which you have tapped, screw a coupling elbow. Turn
this elbow down hard so as to make an air tight joint.
Be sure you connect this to the proper opening which is marked "vacuum
line" on the top of the tank.
Join the tubing with the coupling elbow, as shown in Fig. 1. Unscrew
the nut (L) and remove the wedge ring (0).
Slip the end of the tubing through the nut (L), then through the
wedge ring (0).
Previous page 1927
Supplement Home Next page 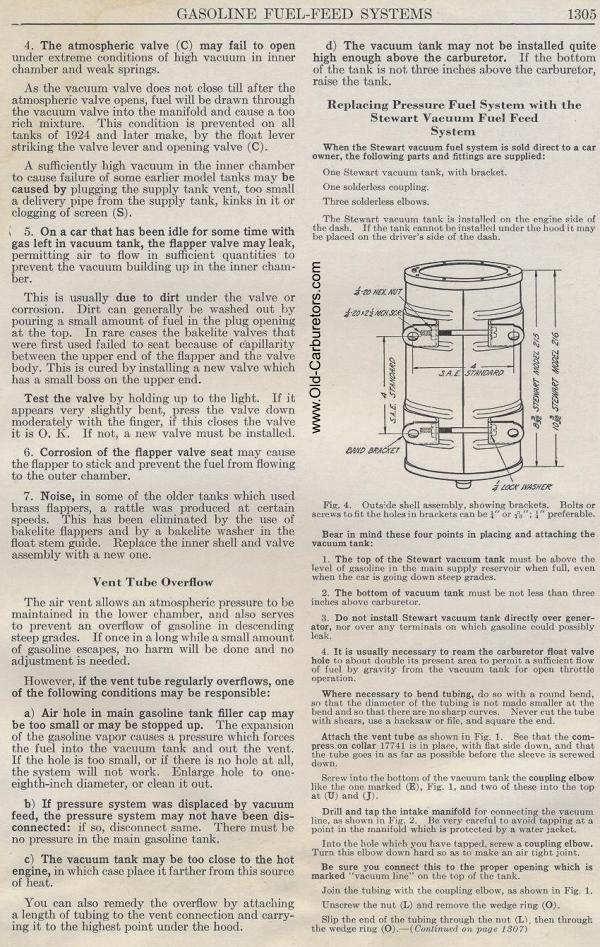
|