Engine Bearings
This oil-pressure test has been in successful use in the Air Service
and in the maintenance stations of two prominent automobile manufacturers
for several years.
If properly applied, it will indicate the following:
1. The condition of the bearings in pressure-lubricated engines,
that is, if there is too much diametrical clearance, also if the
end clearance is more than the manufacturer's recommendation.
2. Whether or not over-oiling is due to improperly fitted bearings
or the cause is in the pistons and rings.
3. If drilled passages of camshaft and oil-distributing line are
clogged or partially obstructed.
4. Will serve to check the fit of bearings after over-hauling as
well as for inspection before overhauling.
5. Will check the condition or accuracy of the pressure gauge on
the car instrument board.
Testing Bearings on a Pressure-Lubricated
Engine with Oil under Pressure'
The testing outfit which is shown in Fig. 1 consists essentially
of a gallon tank that will stand about 100 lbs. pressure, an air-pressure
gauge soldered into the top, an outlet nipple and shut-off valve
at the bottom, a tire valve stem, and some form of filling spout
with an air-tight joint at the top.
The outlet nipple on the test tank is connected to the oil circuit
of the engine immediately past the regular engine oil-pump outlet.
The oil pump of the engine should always be kept out of the circuit,
and if there is any difficulty in doing this, follow the oil line
to the point where the oil leaves the pump and first enters the
crankshaft bearings. Thiswill be the .
point where you will (0 roA/RwRPCr
want to connect the out- TIRE VALVESTEM let side of the test tank..
REMOVED
Fig. 2. The outlet of test tank is always connected to the oil
circuit at the point where the engine pump outlet was connected.
When this equipment has been secured, the mechanic is ready to
proceed on the test as follows:
1. Drop oil pan from engine so as to expose lower rod and main
bearings. Place large drip pan under engine to collect oil thrown
off during test.
2. Pour about three quarts of oil into test tank, screw filler
cap on tightly, and close lower valve.
Oil used in the test tank should be of the same grade and viscosity
as used for lubrication in the particular engine. Very good results
will be obtained by using the oil drained from engine being worked
on. However, if the drained oil is badly thinned or diluted, use
new light or medium grade oil.
3. With a suitable piece of copper tubing or high-pressure air
hose, connect the outlet nipple on the test tank to oil-distributing
manifold in engine.
If there is any doubt as to where to make the connection, follow
the oil line from the outlet side of the pump to the point where
the oil first enters the crankshaft or distributing manifold as
the case may be. This will be the point where the test tank is
to be connected.
1 See also page 806 of Auto Encyclopedia.
4. With a hand pump or compressor attached to the tire valve in
the test tank, pump air into it until the gauge shows about 30
lbs. pressure.
If the engine is designed to operate at a higher oil pressure,
raise the pressure in the test tank to correspond to the engine
manufacturers' recommended average oil pressure.
5. Now open the shut-off valve at bottom of test tank, turn engine
slowly by hand, and observe reading on the car instrument board
oil gauge and air gauge on test tank. The readings should be approximately
the same.
The gauge on test tank should show not more than 5 lbs. pressure
increase over that of the oil gauge on the instrument board.
6. Watch underneath to observe the amount of oil coming out of
the bearings. There should be a drippage from each, but in no case
(except when the previously mentioned metering holes register)
should the leakage be in a solid stream.
Exceptions to this are on those engines
where the front end chain or gears are pres
sure lubricated, and also on those con-
structions where piston and pin lubrication is accomplished by
means of holes in
the lower connecting-rod bearing (Fig. 2 A,
at 8) which register with the metering or
supply hole in the crank pin, at which time rig. 2A oil shoots
up to the piston and cylinder walls. (A construction of this type
is used on Chrysler, Franklin, and Nash engines.) Exceptions also
apply to engines using a longitudinally drilled rod, such as Packard
6 and 8 or a piston-pin-bearing oil-supply pipe, attached to side
of rod, as on the Velie and Marmon.
In either case when these holes line up there will be a drop in
pressure and an excessive amount of leakage from the bearing in
the register position.
The maximum and minimum drippage standards indicated in the following
paragraphs will enable a satisfactory check of the condition of
rod and main bearings. Where the repair establishment is specializing
on one certain make of car, it is possible to establish even more
accurate standards of oil drip-page by applying the test tank to
one of these known to be in perfect shape. By observing the exact
number of drops leakage per minute using any given brand and viscosity
grade of oil under a given test-tank pressure, the data recorded
can be set up as the ideal standard for that make and model.
Similarly if the test is applied to a car of same make and model
where it is known that one or more bearings are loose or otherwise
imperfect, the amount of leakage indicating the conditions will
be set up as the rejection standard for that car.
The ideal contact and clearance exist when the leakage from any
rod or main bearing does not exceed 80 drops per minute maximum,
and is not less than 10 drops per minute minimum (on Studebaker "Big
Six" the manufacturers recommend that the leakage from main
and connecting-rod bearings be not less than 20 drops per minute
and not fast enough to run in a solid stream).
A stream of oil from any bearing indicates that it has either too
much clearance, improper grooving, poorly fitted shims, excessive
end play, or a bad joint between the rod and cap.
Any bearing showing more than 100 drops leakage using medium oil,
or 140 drops per minute with light oil in test tank should be removed
and inspected for one or more of the conditions just mentioned.
Previous page 1927
Supplement Home Next page 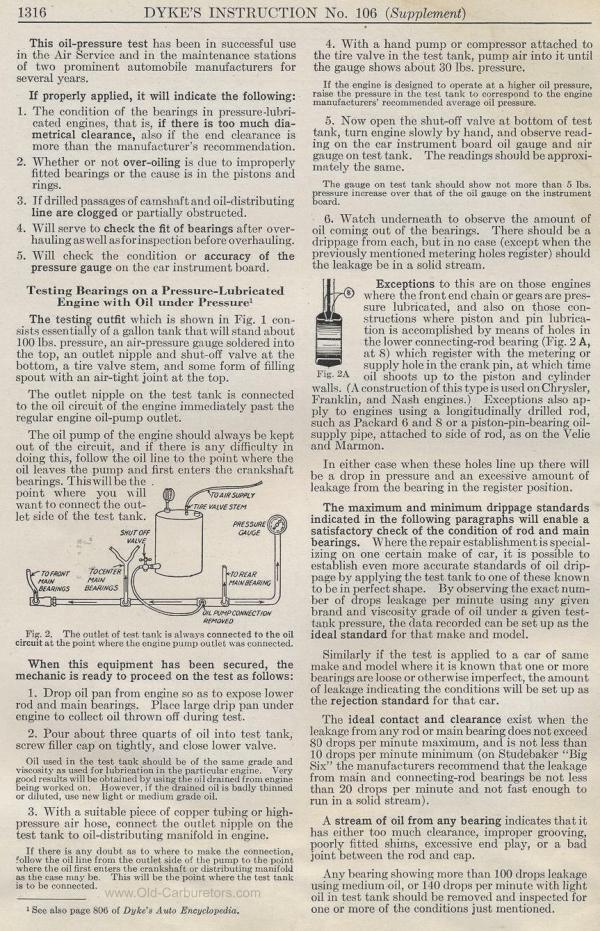
|