1935 Chevy Care of Finish
All Chevrolet bodies are finished in Duco and the outstanding advantage
of this finish is the ease with which it may be kept clean. Duco
is the hardest and most durable automobile finish developed.
However, it should be washed and polished at regular intervals
to keep it looking new.
We recommend the use of Genuine Chevrolet Duco polish, which is
good for the baked enamel parts, as well as the Duco'd parts. It
is a cleaner as well as a polish. It softens and removes dirt film,
and restores the original lustre of the finish.
Care of Top Material —Standard Models
Should the top become dull or check-marked, clean it thoroughly
and apply a coat of Genuine Chevrolet Waterproof Preserver. This
should be applied with a flat varnish brush or sprayed on. Genuine
Chevrolet Waterproof Preserver will protect the top fabric and
keep it thoroughly water-proof. A coat of this dressing every six
months will keep the top in perfect condition.
Door Weatherstrips
Weatherstrips on Master bodies are now being attached to doors
by a spot-welded metal Retainer, which carries the rubber Weatherstrip.
This design should eliminate all complaints of water leaks, etc.,
experienced with the previous de-sign in which the Weatherstrip
was attached to the body; however, the latest design of Weatherstrip
which attaches to the door CAN NOT be applied to early design cars.
The following covers instructions for replacing or reattaching
the weatherstrips to bodies around the front door openings on all
1935 Master Model closed bodies:
Two types of cement are required.
Minnesota Mining Company No. 22—Fisher Body No. F.S. 1039,
is used on the metal.
Minnesota Mining Company No. S - 31—Fisher Body No. F.S.
1040, is used on the rubber.
The rubber should be free from excessive soap-stone or powder.
It may be wiped off lightly with a cloth dampened with gasoline.
Do not use too much gasoline or it will open up the cells in the
sponge rubber.
Apply a coat of F.S. 1039 cement to the metal, and a coat of F.S.
1040 to the rubber.
Allow cement to become tacky and then press rubber firmly into
place. Do not close door beyond first catch in striker plate for
one hour after rubber is assembled.
Headlining
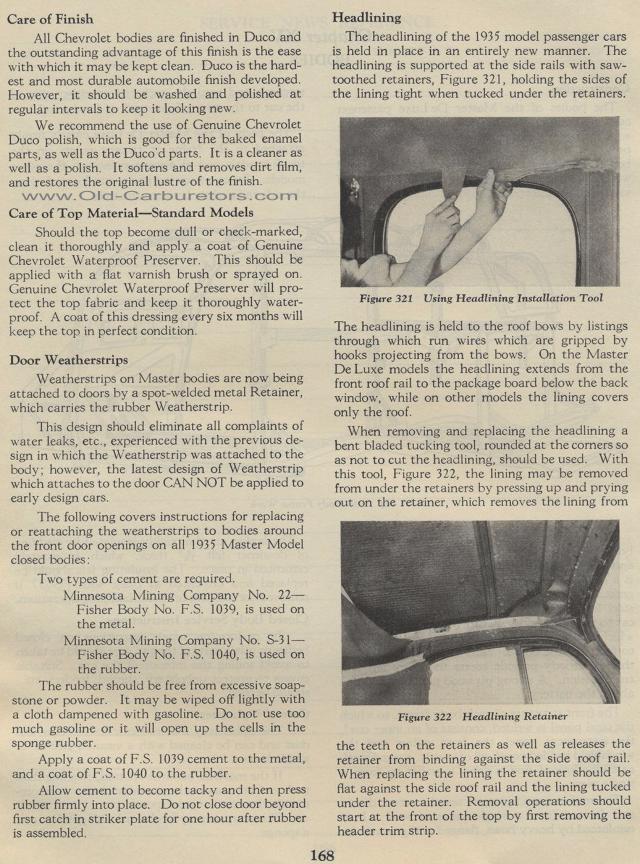
The headlining of the 1935 model passenger cars is held in place
in an entirely new manner. The headlining is supported at the side
rails with saw-toothed retainers, Figure 321, holding the sides
of the lining tight when tucked under the retainers.
Figure 321 Using Headlining Installation Tool
The headlining is held to the roof bows by listings through which
run wires which are gripped by hooks projecting from the bows.
On the Master De Luxe models the headlining extends from the front
roof rail to the package board below the back window, while on
other models the lining covers only the roof.
When removing and replacing the headlining a bent bladed tucking
tool, rounded at the corners so as not to cut the headlining, should
be used. With this tool, Figure 322, the lining may be removed
from under the retainers by pressing up and prying out on the retainer,
which removes the lining from
Figure 322 Headlining Retainer
the teeth on the retainers as well as releases the retainer from
binding against the side roof rail. When replacing the lining the
retainer should be flat against the side roof rail and the lining
tucked under the retainer. Removal operations should start at the
front of the top by first removing the header trim strip.
|