Old Buick Carburetors : BUICK MODELS 50 60 70 90 1941 1942Previous | Home | Next |
 |
Page 2
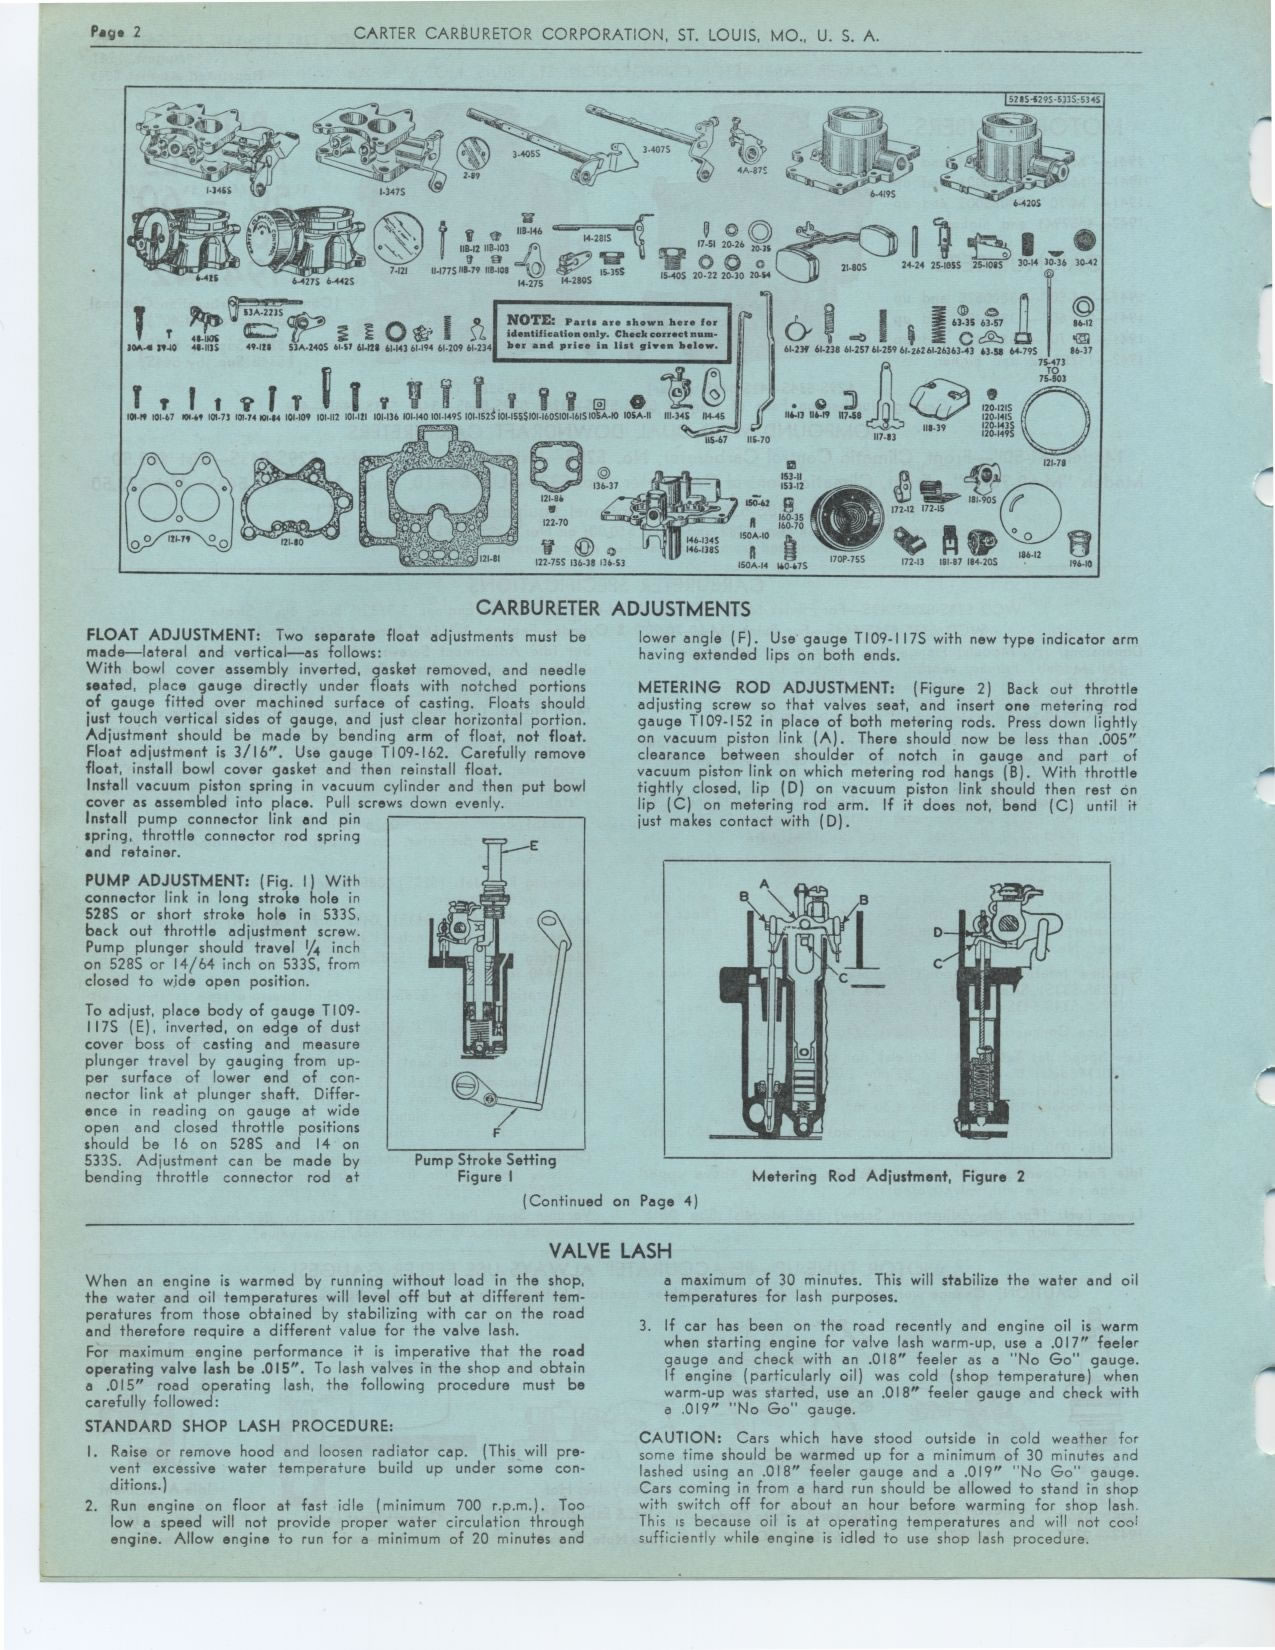
52854295-5335 5345
116-146 IIB-12 1IB-103
II47751IB-79 118-108
48-1106
63-35 63.57 I 66-12
CGD
.®*
10A-4 1140 44-1135 99411 53A-2405 61-57 61428 61.143 61.194 61-209 61.234
T t I I u1T Q I? V Y I
101-4 101-67 101-69 101-71 101.74 101.64 101-109 101-112 101-121 101.136 101-140101-1496
101.152St 10I-155$101-1605101-161510 6-10 IOSA-11
NOTE: Parts are shown here for
identiliealion only. Check eorrect...-ber and price in list glean below.
6 1 66 61-238 61257 61.259 61-2626626363.43 63.58 64-795 86-37 75.473 TO
75-503
*0:0
196-10
CARBURETER
FLOAT ADJUSTMENT: Two separate float adjustments must be made—lateral
and vertical—as follows:
With bowl cover assembly inverted, gasket removed, and needle seated, place
gauge directly under floats with notched portions of gauge fitted over machined
surface of casting. Floats should just touch vertical sides of gauge, and just
clear horizontal portion. Adjustment should be made by bending arm of float,
not float. Float adjustment is 3/16". Use gauge T109-162. Carefully remove
float, install bowl cover gasket and then reinstall float.
Install vacuum piston spring in vacuum cylinder and then put bowl cover as
assembled into place. Pull screws down evenly. Install pump connector link
and pin spring, throttle connector rod spring and retainer.
PUMP ADJUSTMENT: (Fig. I) With connector link in long stroke hole in 528S or
short stroke hole in 5335, back out throttle adjustment screw. Pump plunger
should travel V4 inch on 528S or 14/64 inch on 533S, from closed to wide open
position.
To adjust, place body of gauge T109-II7S (E), inverted, on edge of dust cover
boss of casting and measure plunger travel by gauging from up-per surface of
lower end of connector link at plunger shaft. Difference in reading on gauge
at wide open and closed throttle positions should be 16 on 528S and 14 on
533S. Adjustment can be made by Pump Stroke Setting
bending throttle connector rod at Figure I
ADJUSTMENTS
lower angle (F). Use gauge T109-117S with new type indicator arm having extended
lips on both ends.
METERING ROD ADJUSTMENT: (Figure 2) Back out throttle adjusting screw so that
valves seat, and insert one metering rod gauge T109-152 in place of both metering
rods. Press down lightly on vacuum piston link (A). There should now be less
than .005" clearance between shoulder of notch in gauge and part of vacuum
piston- link on which metering rod hangs (B). With throttle tightly closed,
lip (D) on vacuum piston link should then rest on lip (C) on metering rod arm.
If it does not, bend (C) until it just makes contact with (D).
Metering Rod Adjustment, Figure 2
(Continued on Page 4)
VALVE LASH
When an engine is warmed by running without load in the shop, the water and
oil temperatures will level off but at different temperatures from those obtained
by stabilizing with car on the road and therefore require a different value
for the valve lash.
For maximum engine performance it is imperative that the road operating valve
lash be .015". To lash valves in the shop and obtain a .015" road
operating lash, the following procedure must be carefully followed:
STANDARD SHOP LASH PROCEDURE:
I. Raise or remove hood and loosen radiator cap. (This will pre-vent excessive
water temperature build up under some conditions.)
2. Run engine on floor at fast idle (minimum 700 r.p.m.). Too low a speed will
not provide proper water circulation through engine. Allow engine to run for
a minimum of 20 minutes and
a maximum of 30 minutes. This will stabilize the water and oil temperatures
for lash purposes.
3. If car has been on the road recently and engine oil is warm when starting
engine for valve lash warm-up, use a .017" feeler gauge and check with
an .018" feeler as a "No Go" gauge. If engine (particularly
oil) was cold (shop temperature) when warm-up was started, use an .018" feeler
gauge and check with a .019" "No Go" gauge.
CAUTION: Cars which have stood outside in cold weather for some time should
be warmed up for a minimum of 30 minutes and lashed using an .018" feeler
gauge and a .019" "No Go" gauge. Cars coming in from a hard
run should be allowed to stand in shop with switch off for about an hour before
warming for shop lash. This is because oil is at operating temperatures and
will not coo+ sufficiently while engine is idled to use shop lash procedure.