|
Page 2 CARTER CARBURETOR CORPORATION, ST. LOUIS. MO., U. S.
A.
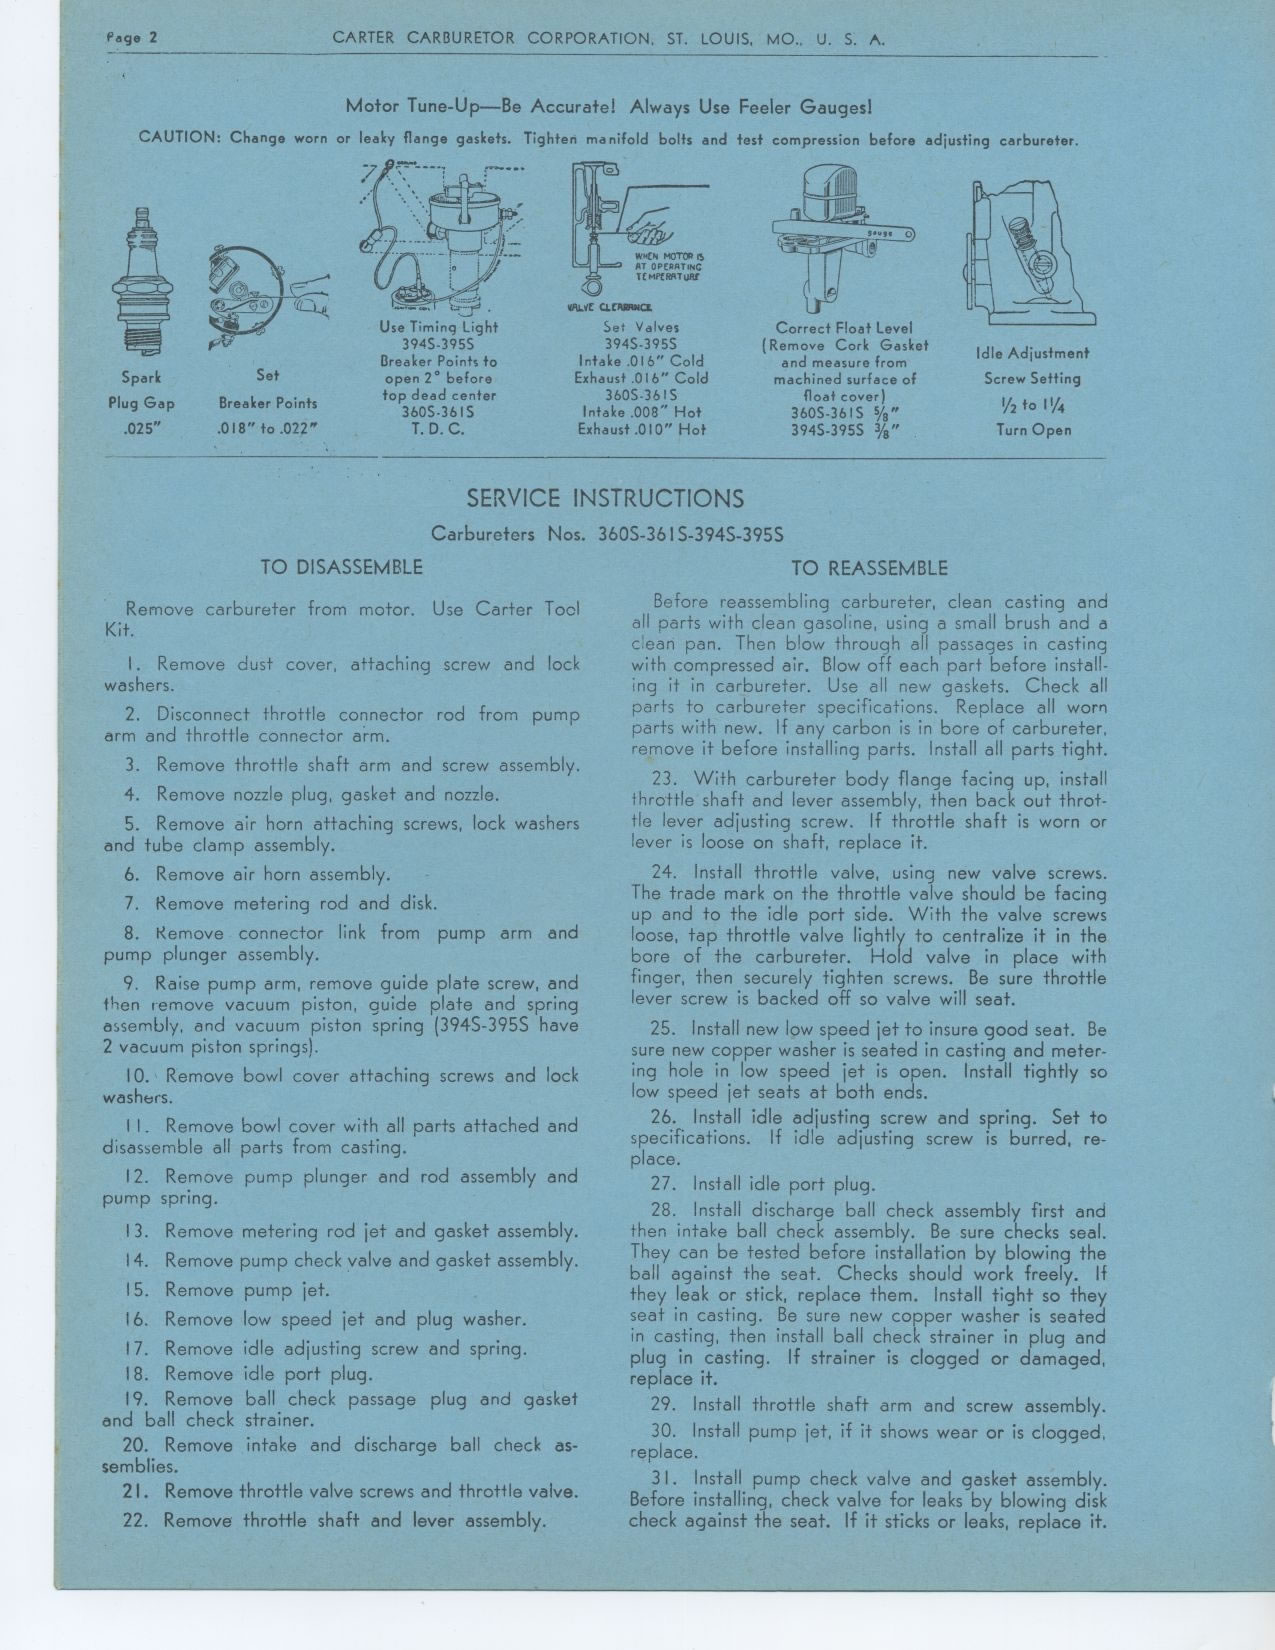
Motor Tune-Up--Be Accurate! Always Use Feeler Gauges!
CAUTION: Change worn or leaky flange gaskets. Tighten manifold bolts and
test compression before adjusting carbureter.
v$Lvt arrow¢
Set Valves
394S-395S
Intake .016" Cold
Exhaust .016" Cold
360S-361S
Intake .008" Hot
Exhaust .010" Hot
Correct Float Level
(Remove Cork Gasket
and measure from
machined surface of
float cover)
360S-361S 5/8"
394S-395S 3/8"
Idle Adjustment Screw Setting
1/2 to 1¼ Turn Open
In:
Spark
Plug Gap
.025"
Set
Breaker Points
.018" to .022"
Use Timing Light
394S-395S
Breaker Points to
open 2° before
top dead center
3605-3615
T. D. C.
SERVICE INSTRUCTIONS
Carburetors Nos. 3605-361 S-394S-3955
TO DISASSEMBLE TO REASSEMBLE
Remove carbureter from motor. Use Carter Tool Kit.
1. Remove dust cover, attaching screw and lock washers.
2. Disconnect throttle connector rod from pump arm and throttle connector
arm.
3. Remove throttle shaft arm and screw assembly.
4. Remove nozzle plug, gasket and nozzle.
5. Remove air horn attaching screws, lock washers and tube clamp assembly.
6. Remove air horn assembly.
7. Remove metering rod and disk.
8. Remove connector link from pump arm and pump plunger assembly.
9. Raise pump arm, remove guide plate screw, and then remove vacuum piston,
guide plate and spring assembly, and vacuum piston spring (394S-395S have
2 vacuum piston springs).
10. Remove bowl cover attaching screws and lock washers.
I I. Remove bowl cover with all parts attached and disassemble all parts
from casting.
12. Remove pump plunger and rod assembly and pump spring.
13. Remove metering rod jet and gasket assembly.
14. Remove pump check valve and gasket assembly.
15. Remove pump jet.
16. Remove low speed jet and plug washer.
17. Remove idle adjusting screw and spring.
18. Remove idle port plug.
19. Remove ball check passage plug and gasket and ball check strainer.
20. Remove intake and discharge ball check assemblies.
2I. Remove throttle valve screws and throttle valve.
22. Remove throttle shaft and lever assembly.
Before reassembling carbureter, clean casting and all parts with clean gasoline,
using a small brush and a clean pan. Then blow through all passages in casting
with compressed air. Blow off each part before installing it in carbureter.
Use all new gaskets. Check all parts to carbureter specifications. Replace
all worn parts with new. If any carbon is in bore of carbureter, remove it
before installing parts. Install all parts tight.
23. With carbureter body flange facing up, install throttle shaft and lever
assembly, then back out throttle lever adjusting screw. If throttle shaft
is worn or lever is loose on shaft, replace it.
24. Install throttle valve, using new valve screws. The trade mark on the
throttle valve should be facing up and to the idle port side. With the valve
screws loose, tap throttle valve lightly to centralize it in the bore of
the carbureter. Hold valve in place with finger, then securely tighten screws.
Be sure throttle lever screw is backed off so valve will seat.
25. Install new low speed jet to insure good seat. Be sure new copper washer
is seated in casting and metering hole in low speed jet is open. Install
tightly so low speed jet seats at both ends.
26. Install idle adjusting screw and spring. Set to specifications. If idle
adjusting screw is burred, re-place.
27. Install idle port plug.
28. Install discharge ball check assembly first and then intake ball check
assembly. Be sure checks seal. They can be tested before installation by
blowing the ball against the seat. Checks should work freely. If they leak
or stick, replace them. Install tight so they seat in casting. Be sure new
copper washer is seated in casting, then install ball check strainer in plug
and plug in casting. If strainer is clogged or damaged, replace it.
29. Install throttle shaft arm and screw assembly.
30. Install pump jet, if it shows wear or is clogged, replace.
31. Install pump check valve and gasket assembly. Before installing, check
valve for leaks by blowing disk check against the seat. If it sticks or leaks,
replace it.
|