Skip to: site menu | section menu | main content
This type of universal joint construction necessitates the sliding back of the rear axle to remove it from the end of the transmission main shaft. To remove, unhook the brake rods and the spring "U" bolts from the rear axle and slide the axle to the rear until the propeller shaft and propeller shaft housing is free of the rear yoke and the universal joint ball. Remove the universal joint ball collar cap screws, collar and ball. With a long shank special wrench remove the cap screw holding the joint assembly to the end of the transmission main shaft and remove the joint assembly.
After the universal joint has been assembled back to the end of the transmission main shaft, and the universal joint ball and collar are in their proper places, remove the pipe plug from the top of the universal joint ball retainer on the end of the transmission. Fill this part with transmission lubricant. This joint will require no further lubrication as additional lubrication is received from the transmission.
Because of this type of construction, this joint will be sold only
as an assembly, the parts that are part of it not being serviced
separately.
Universal Joint (Master 1 1/2 Ton Trucks)
The universal joint at the rear of the trans-mission, on the 1
1/2 ton trucks, is of the four arm spider type. See Fig. 136. The
spider is made from a steel drop forging, heat treated to provide
strength. The four arms are ground to provide a smooth surface
for the trunnion bearings and have a flat surface machined on each
side of them to pro-vide a means for lubricant to enter and lubricate
these bearings. The four trunnion or cylindrical bearings are carefully
ground inside and out to provide smooth action on the spider and
positive seating in the yoke. These bearings are assembled from
the sides of the yoke and are held in place by spring steel snap
rings.
To remove this joint, remove the speedometer gear and shaft from
the joint ball retainer. Re-move the two nuts holding the front
propeller shaft assembly to the cross member and drop this unit.
Remove the screws holding the ball collar to the ball retainer
and slide the ball back on the propeller shaft housing.
Remove the trunnion bearing lock wires with a drift or other sharp
pointed tool by lifting them free from their slots. Drive the trunnion
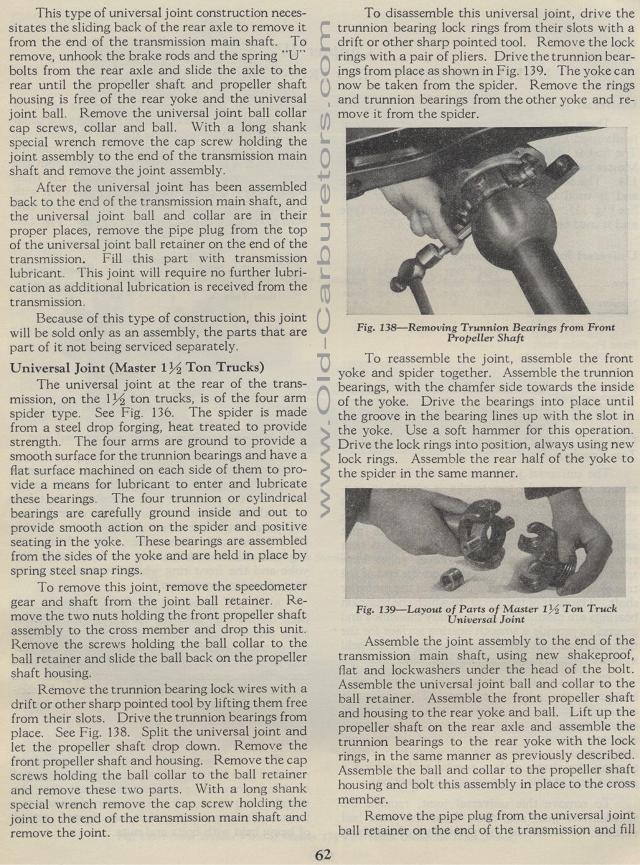
bearings from place. See Fig. 138. Split the universal joint and
let the propeller shaft drop down. Remove the front propeller shaft
and housing. Remove the cap screws holding the ball collar to the
ball retainer and remove these two parts. With a long shank special
wrench remove the cap screw holding the joint to the end of the
transmission main shaft and remove the joint.
62
To disassemble this universal joint, drive the trunnion bearing
lock rings from their slots with a drift or other sharp pointed
tool. Remove the lock rings with a pair of pliers. Drive the trunnion
bearings from place as shown in Fig. 139. The yoke can now be taken
from the spider. Remove the rings and trunnion bearings from the
other yoke and re-move it from the spider.
Fig. 138— Removing Trunnion Bearings from Front
Propeller Shaft
To reassemble the joint, assemble the front yoke and spider together.
Assemble the trunnion bearings, with the chamfer side towards the
inside of the yoke. Drive the bearings into place until the groove
in the bearing lines up with the slot in the yoke. Use a soft hammer
for this operation. Drive the lock rings into position, always
using new lock rings. Assemble the rear half of the yoke to the
spider in the same manner.
Fig. 139— Layout of Parts of Master 1 1/2Ton Truck
Universal Joint
Assemble the joint assembly to the end of the transmission main
shaft, using new shakeproof, flat and lockwashers under the head
of the bolt. Assemble the universal joint ball and collar to the
ball retainer. Assemble the front propeller shaft and housing to
the rear yoke and ball. Lift up the propeller shaft on the rear
axle and assemble the trunnion bearings to the rear yoke with the
lock rings, in the same manner as previously described. Assemble
the ball and collar to the propeller shaft housing and bolt this
assembly in place to the cross member.
Remove the pipe plug from the universal joint ball retainer on
the end of the transmission and fill
