Skip to: site menu | section menu | main content
BRAKE ADJUSTMENT
INSTRUCTIONS
SERIES "EB"-
ONE-HALF TON TRUCKS
1. Disconnect pedal pull-back spring, brake pull rod, front and rear pull rods and hand brake pull rod.
2. Set hand brake lever to its extreme forward position and adjust
hand brake pull rod to its proper length—11M" between
centers. This can be accurately measured by measuring from the
back of the front hole to the back of the slot. Assemble pull rod
to the hand brake and cross shaft levers.
3. Hook up pull-back spring and set the brake pedal stop so that
the brake pedal clears the floor board W.
4. With the brake pedal against its stop, adjust the pedal pull
rod to its proper length. Connect up pull rod.
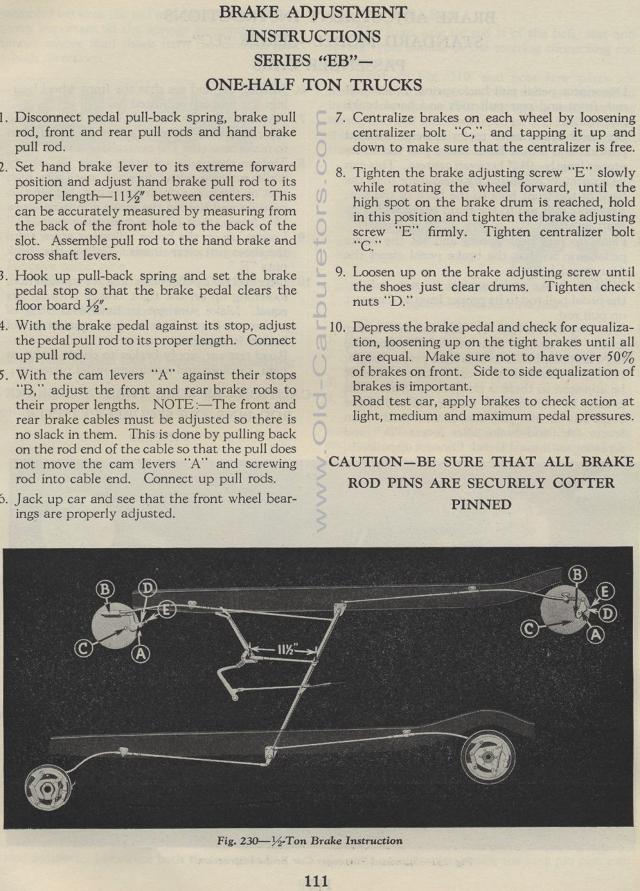
5. With the cam levers "A" against their stops "B," adjust
the front and rear brake rods to their proper lengths. NOTE:— The
front and rear brake cables must be adjusted so there is no slack
in them. This is done by pulling back on the rod end of the cable
so that the pull does not move the cam levers "A" and
screwing rod into cable end. Connect up pull rods.
6. Jack up car and see that the front wheel bearings are properly
adjusted.
7. Centralize brakes on each wheel by loosening centralizer bolt "C," and
tapping it up and down to make sure that the centralizer is free.
8. Tighten the brake adjusting screw "E" slowly while
rotating the wheel forward, until the high spot on the brake drum
is reached, hold in this position and tighten the brake adjusting
screw "E" firmly. Tighten centralizer bolt "C."
9. Loosen up on the brake adjusting screw until the shoes just
clear drums. Tighten check nuts "D."
10. Depress the brake pedal and check for equalization, loosening
up on the tight brakes until all are equal. Make sure not to have
over 50% of brakes on front. Side to side equalization of brakes
is important.
Road test car, apply brakes to check action at light, medium and
maximum pedal pressures.
CAUTION— BE SURE THAT ALL BRAKE
ROD PINS ARE SECURELY COTTER
PINNED
Fig. 230—-Half Ton Brake Instruction
