Skip to: site menu | section menu | main content
1935 Chevy Water Pump
The water pump is of the centrifugal type, and is belt driven from the pulley on the crankshaft. The design of this pump is such that it insures the proper circulation of cool water in the water jackets
Fig. 78— Water Pump Pulley
surrounding the cylinder walls at all times regard-less of engine
speeds. The water pump has balanced impeller blades which increases
the life of the thrust washer and maintains the efficiency of the
pump.
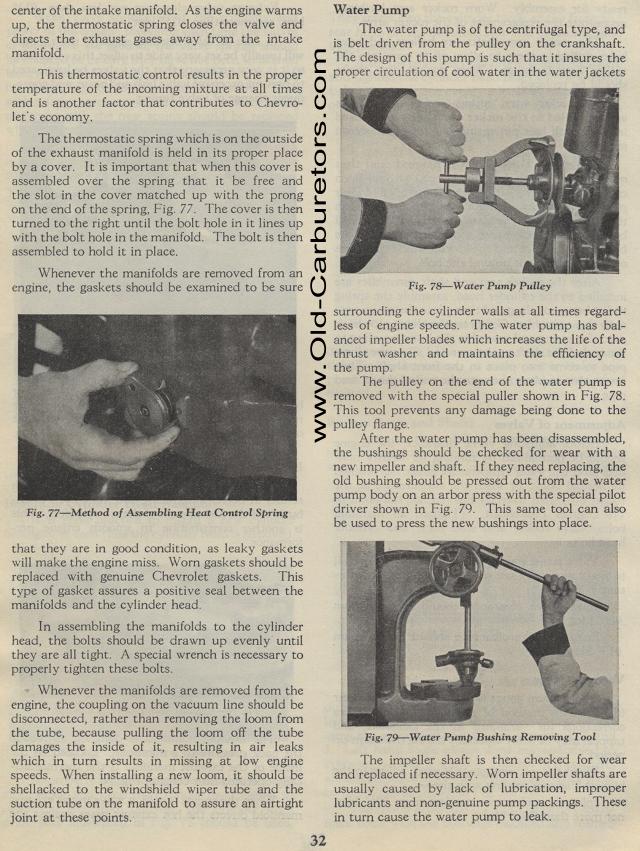
The pulley on the end of the water pump is removed with the special
puller shown in Fig. 78. This tool prevents any damage being done
to the pulley flange.
After the water pump has been disassembled, the bushings should
be checked for wear with a new impeller and shaft. If they need
replacing, the old bushing should be pressed out from the water
pump body on an arbor press with the special pilot driver shown
in Fig. 79. This same tool can also be used to press the new bushings
into place.
Fig. 79— Water Pump Bushing Removing Tool
The impeller shaft is then checked for wear and replaced if necessary.
Worn impeller shafts are usually caused by lack of lubrication,
improper lubricants and non-genuine pump packings. These in turn
cause the water pump to leak.
center of the intake manifold. As the engine warms up, the thermostatic
spring closes the valve and directs the exhaust gases away from
the intake manifold.
This thermostatic control results in the proper temperature of
the incoming mixture at all times and is another factor that contributes
to Chevrolet's economy.
The thermostatic spring which is on the outside of the exhaust
manifold is held in its proper place by a cover. It is important
that when this cover is assembled over the spring that it be free
and the slot in the cover matched up with the prong on the end
of the spring, Fig. 77. The cover is then turned to the right until
the bolt hole in it lines up with the bolt hole in the manifold.
The bolt is then assembled to hold it in place.
Whenever the manifolds are removed from an engine, the gaskets
should be examined to be sure
Fig. 77— Method of Assembling Heat Control Spring
that they are in good condition, as leaky gaskets will make the
engine miss. Worn gaskets should be replaced with genuine Chevrolet
gaskets. This type of gasket assures a positive seal between the
manifolds and the cylinder head.
In assembling the manifolds to the cylinder head, the bolts should
be drawn up evenly until they are all tight. A special wrench is
necessary to properly tighten these bolts.
Whenever the manifolds are removed from the engine, the coupling
on the vacuum line should be disconnected, rather than removing
the loom from the tube, because pulling the loom off the tube damages
the inside of it, resulting in air leaks which in turn results
in missing at low engine speeds. When installing a new loom, it
should be shellacked to the windshield wiper tube and the suction
tube on the manifold to assure an airtight joint at these points.